Introducing APIEngine
First success within 10 minutes
The goal of this section is simple, a user should make their first successful API call within 10 minutes of signing up.
APIEngine is designed so you don’t need to:
- design a database
- deploy infrastructure
- write backend code
- configure environments
You sign up → verify email → copy a token → hit an endpoint → get data back.
What is APIEngine?
APIEngine is a managed API platform that gives you ready-to-use REST endpoints backed by structured data models.
Each API Endpoint:
- represents a standard or custom schema
- supports CRUD operations
- enforces rate limits and validation
- logs every request and response
Think of APIEngine as:
- a programmable data backend
- with predictable behavior
- without needing to host or maintain one yourself
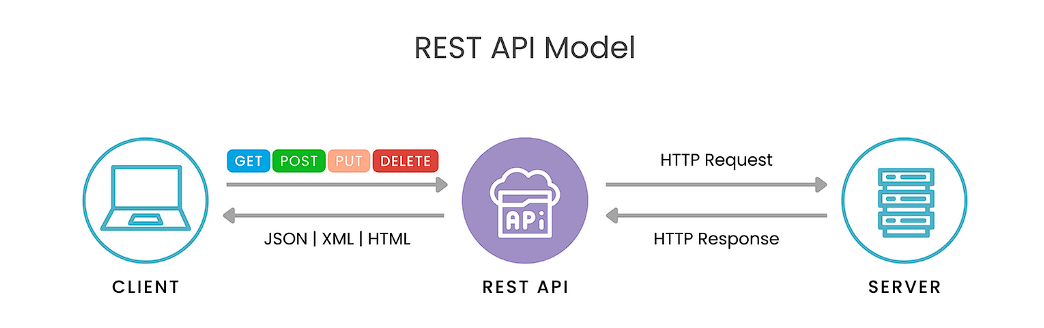
You interact with APIEngine purely over HTTP using standard tools like curl, Postman, or your application code.
Creating An Account
To use APIEngine, you must create an account.
During signup:
- You provide an email address and password
- No payment information is required
- A Free plan is automatically assigned
The account gives you:
- a unique user identity
- scoped API access
- a personal dashboard to monitor usage
Guest access exists for public exploration, but authenticated accounts unlock full functionality.
Email Verification Flow
After signup, you’ll receive a verification email.
Why verification is required:
- prevents abuse and bot traffic
- enables fair rate limiting
- ties API usage to a verified identity
Until verified:
- API calls are blocked
- CRUD Access is limited
- dashboard access is read-only
Once verified
- API access is enabled immediately
- your JWT token becomes active
- request logs start recording
Default FREE Plan
Every new user starts on the Free plan.
The Free plan is meant for:
- learning the platform
- testing integrations
- building prototypes
- validating use cases
It includes:
- 5 Standard and 2 Custom Objects
- 3,000 API Calls per month.
- Create 1,000 Custom Records
- Basic Filtering and Sorting Available
Upgrades are optional and only required when scaling usage.
Available Schemas
Out of the box, APIEngine provides standard schemas across common domains, such as:
- Standard Users
- Orders
- Products
- Payments
- Support Ticket
Each schema:
- has a fixed structure
- supports GET / POST / PATCH / DELETE
- enforces field-level validation
You can immediately query or write data without creating tables or writing migrations.
Dashboard Overview
After login, users land on the Dashboard. The dashboard shows:
- API call usage (today / remaining)
- Plan and Profile Details
- Record Usage (created / remaining)
- Recent request logs
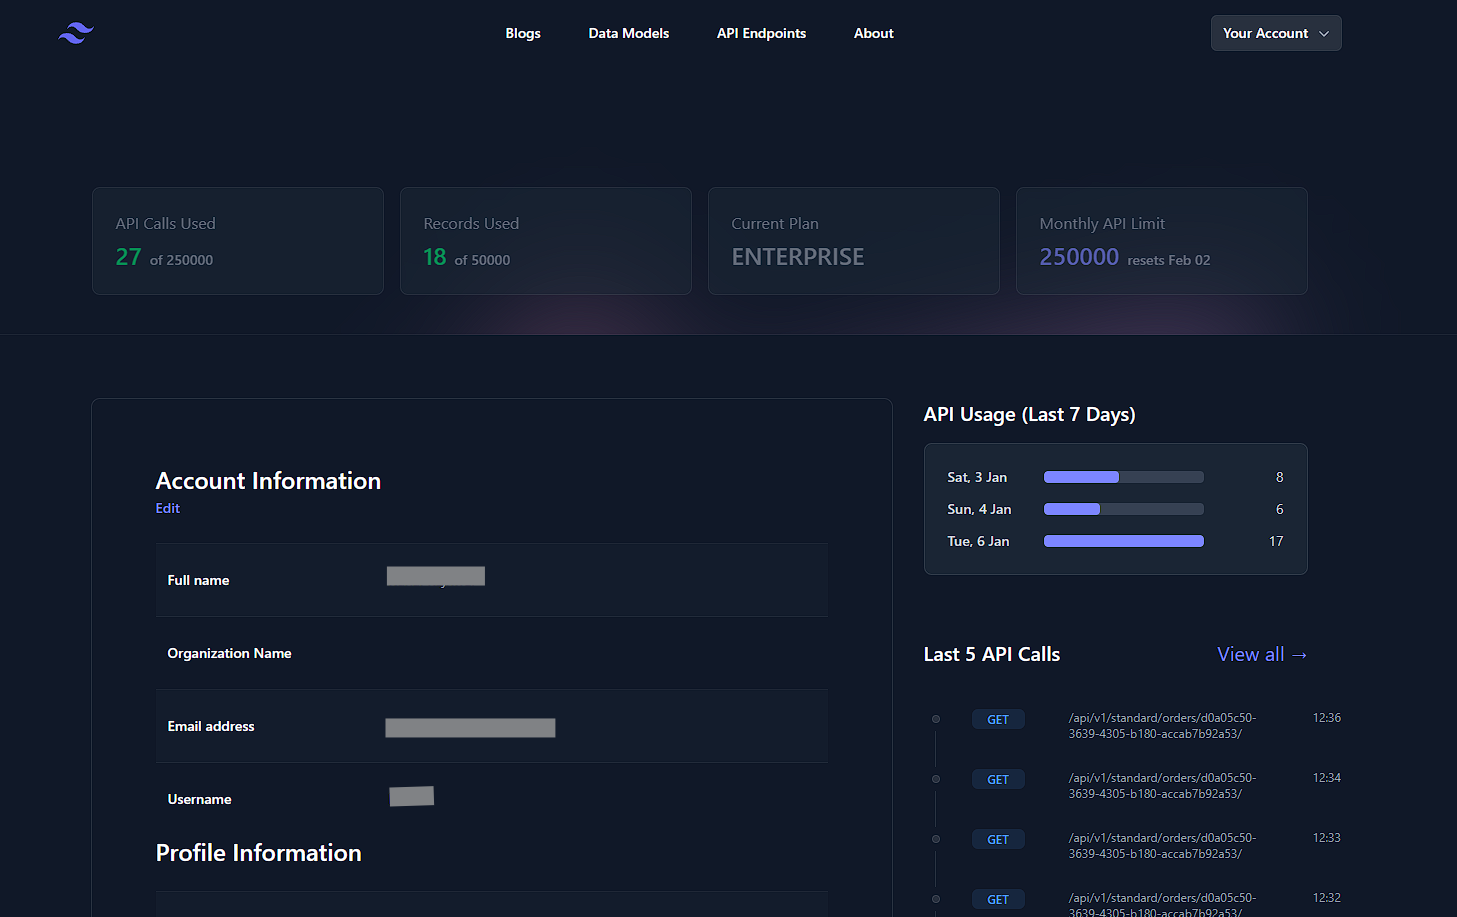
This is the control center for:
- understanding how your APIs behave
- debugging failed requests
- monitoring usage trends
You don’t configure APIs here — you observe and control them.
1. Authentication & Security
How requests are authenticated and secured
Every request to APIEngine is authenticated, validated, and logged before it reaches any data layer.
At a high level:
- Requests must include a valid authentication token
- Tokens identify who is making the request
- Access limits and permissions are enforced at the token level
- All requests are transmitted over HTTPS only
If authentication fails:
- the request is rejected immediately
- no schema or data logic is executed
- the attempt is still logged for audit purposes
What is JWT
A JWT (JSON Web Token) is a signed proof of identity sent with each request. Instead of sending your email/username and password everytime, you send a short-lived JSON Token that proves you are already authenticated.
A JSON Web Token:
- is issued after login
- is cryptographically signed
- cannot be altered without invalidation
- expires automatically
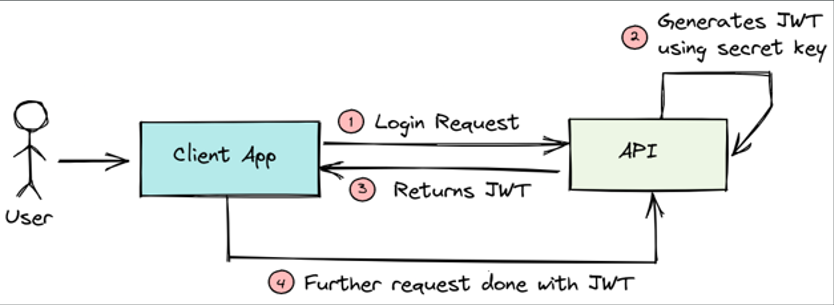
You can think of it as a temporary access pass for the API.
How APIEngine uses JWTs
APIEngine uses JWTs as the single source of identity for API access.
Each JWT is tied to:
- a verified user account
- an active subscription plan
- rate limits and storage limits
- request logging and analytics
No token → no access.
Generating API keys / tokens
APIEngine does not allow users to manually create, view, or store API keys from the dashboard UI.
Instead, tokens are:
- issued only by the backend
- never persisted or exposed in frontend pages
- always tied to a verified account and plan
This design ensures tokens are never leaked through:
- browser storage or frontend logs
- accidental screenshots
- client-side JavaScript access
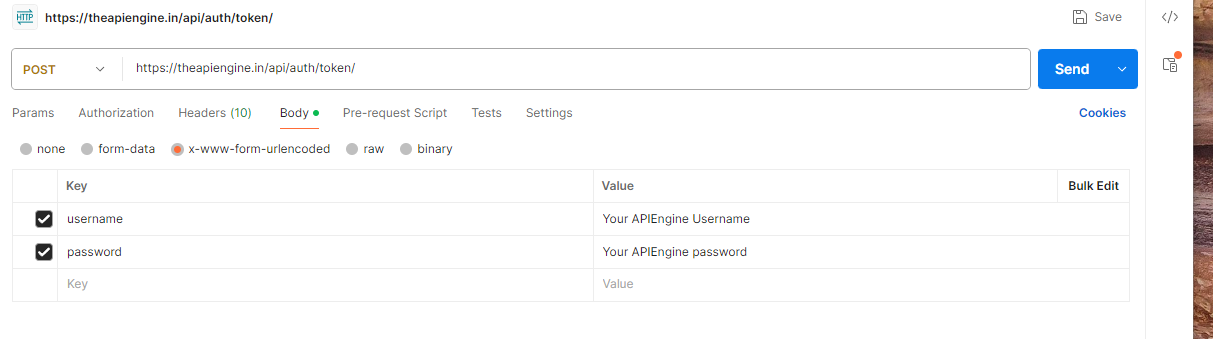
Execute the following steps to generate your JWT token.
Note: Please ensure your credentials are valid, and you have verified your email before proceeding.
- Step 1 : Open Postman, and sign-in with your credentials.
- Step 2 : Click on New (+) icon to create a new HTTP request.
-
Step 3 : From the HTTP Dropdown Menu, select
POST
. In the URLs tab, enter
https://theapiengine.in/api/auth/token/ - Step 4 : Click on the Body tab, and select x-www-form-urlencoded. In the Key section, add "username" and "password". Ensure, the checkbox next to them are checked.
- Step 5 : In the Value section, enter your APIEngine "username" and "password".
- Step 6 : Click Send.
-
Step 7 : If your credentials are valid, APIEngine will return you a
200 OK
response. In the Body section below, you will see a returned JSON response, with two tokens.
"refresh" : "xxx....xxx"
"access" : "xxx....xxx"

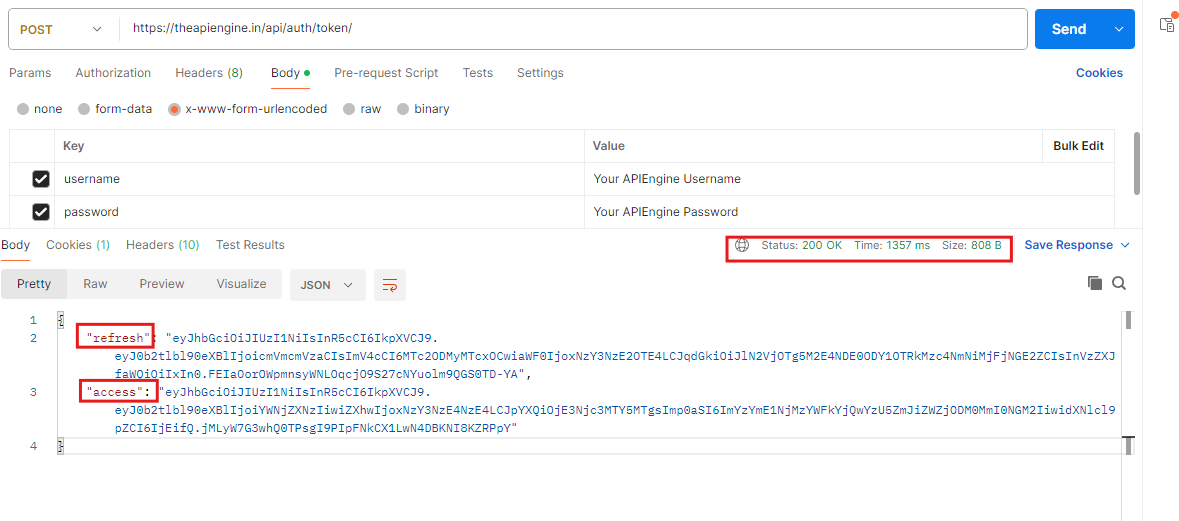
Once you have your access token, you can now make requests to APIEngine's endpoints without entering your username and password each time.
Generating API keys / tokens
APIEngine does not allow users to manually create, view, or store API keys from the dashboard UI.
Instead, tokens are:
- issued only by the backend
- never persisted or exposed in frontend pages
- always tied to a verified account and plan
This design ensures tokens are never leaked through:
- browser storage or frontend logs
- accidental screenshots
- client-side JavaScript access
API Fundamentals (Strongly Recommended)
This section explains how APIs behave at a fundamental level before you start using APIEngine endpoints.
If you are new to backend development, this section will help you:
- understand why requests fail
- read error responses correctly
- avoid common integration mistakes
- debug issues without guessing
Even experienced developers are encouraged to skim this section to understand APIEngine’s request behavior.
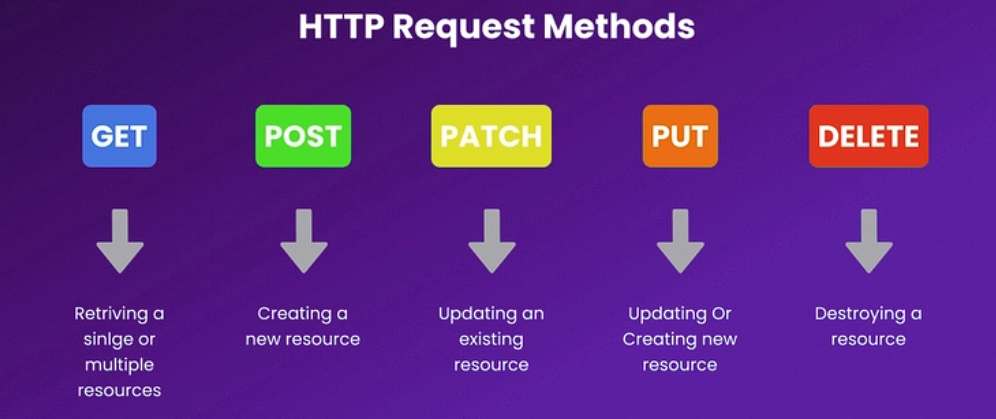
HTTP Methods Explained
HTTP methods define what action you want to perform on a resource.
GET is used to read data and does not modify server state.
POST creates new records and sends data in the request body.
PATCH updates specific fields and is the preferred update method in APIEngine.
DELETE permanently removes a resource and requires proper authorization.
Status Codes You’ll See
- 200 / 201 — request succeeded or resource created
- 400 / 401 / 403 — request or authentication issues
- 429 — API rate limits exceeded
- 500 — server-side failure
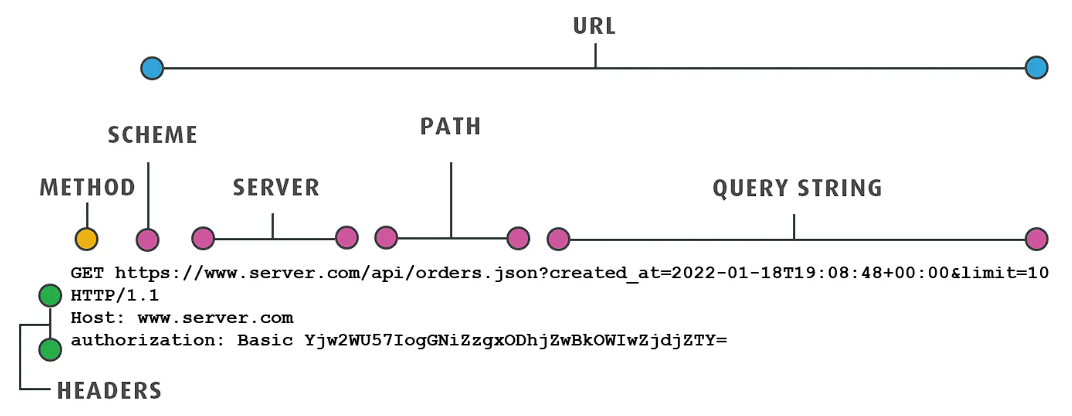
Request Anatomy
Every API request is composed of four parts.
Headers
Metadata sent with the request.
Common headers:
- Authorization — JWT token
-
Content-Type — usually
application/json - Accept — expected response format
Headers are required for authentication, content negotiation, and security enforcement.
Query Parameters
Used to:
- filter data
- paginate results
- apply sorting
Example:
/users?status=active&limit=10
Query parameters do not change data, are optional, and are URL-encoded.
Request Body
Contains the data sent to the server.
Used with:
- POST
- PUT
- PATCH
Characteristics:
- JSON format
- validated against schema
- invalid fields are rejected
Path Parameters
Identify specific resources.
Example:
/users/{id}
Used when:
- fetching a single record
- updating a specific entry
- deleting a resource
APIEngine Endpoints Overview
This section explains what APIs exist in APIEngine, not how to use them yet.
By the end of this section, you should understand:
- what types of endpoints are available
- how endpoints are grouped
- what guarantees APIEngine provides
Usage examples come later — this section is about orientation and trust.
Endpoint Categories
APIEngine endpoints are grouped by intent, not just HTTP method.
Standard Object APIs
These endpoints expose predefined schemas that are ready to use.
Typical use cases:
- prototyping applications
- frontend development
- learning API integrations
- testing workflows
Endpoint pattern:
/api/v1/standard/{object}
Custom Object APIs
- schema defined by you
- field-level control
- enforced validation rules
- plan-based availability
Endpoint pattern:
/api/v1/custom/{object}
🚀 Making Your First Call with APIEngine
You’ve authenticated, you know the data models, and you understand REST.
Now let’s make your first successful API call. What this call proves? In one request, you’ll verify that:
- Your JWT is valid
- Your API key is recognized
- Standard Objects are accessible
- Responses are deterministic
Consider this to be your hello world moment with APIEngine.
Let's Start with Creating a User
We’ll start with a POST call to a Standard Object in the APIEngine. It is so that we have at least one record available associated with your account.
Note: Access tokens expire after a few minutes of being generated. It is recommended that you generate or refresh your access token before proceeding ahead.
- Step 1 : Click on New (+) icon to create a new HTTP request.
-
Step 2 : From the HTTP Dropdown Menu, select
POST
. In the URLs tab, enter
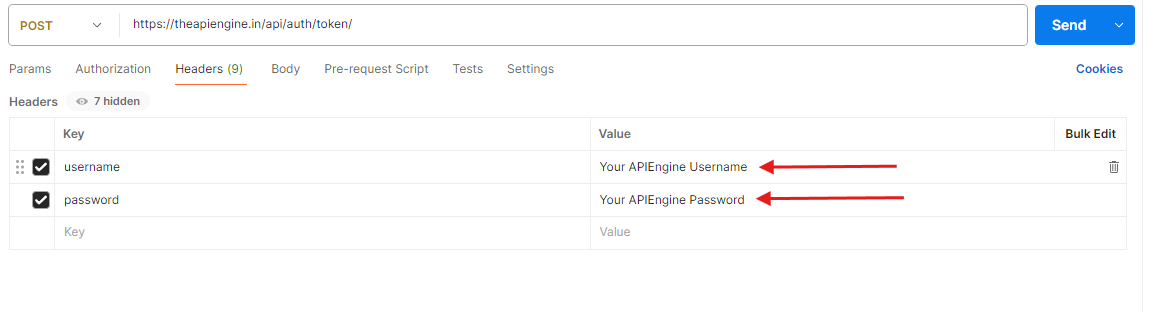
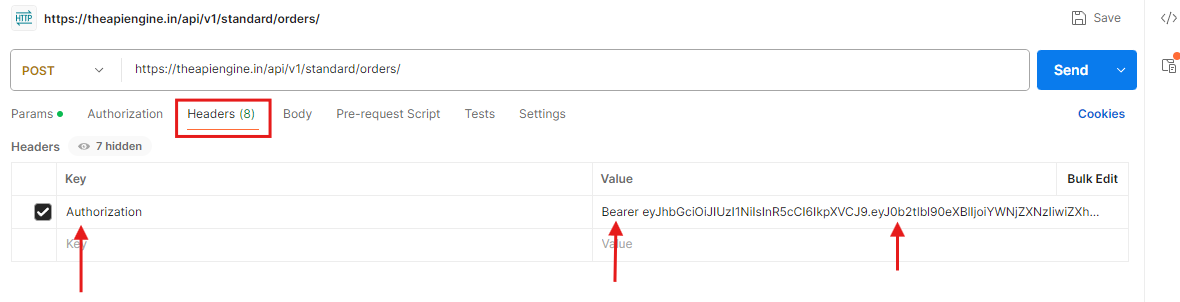
https://theapiengine.in/api/v1/standard/standard-users/ - Step 4 : Click on the Headers tab. In the Key section, add "Authorization". Ensure, the checkbox next to it is checked.
-
Step 5 : In the Value section, type in "Bearer", give a single space, and paste your access token.
Bearer <ACCESS_TOKEN> -
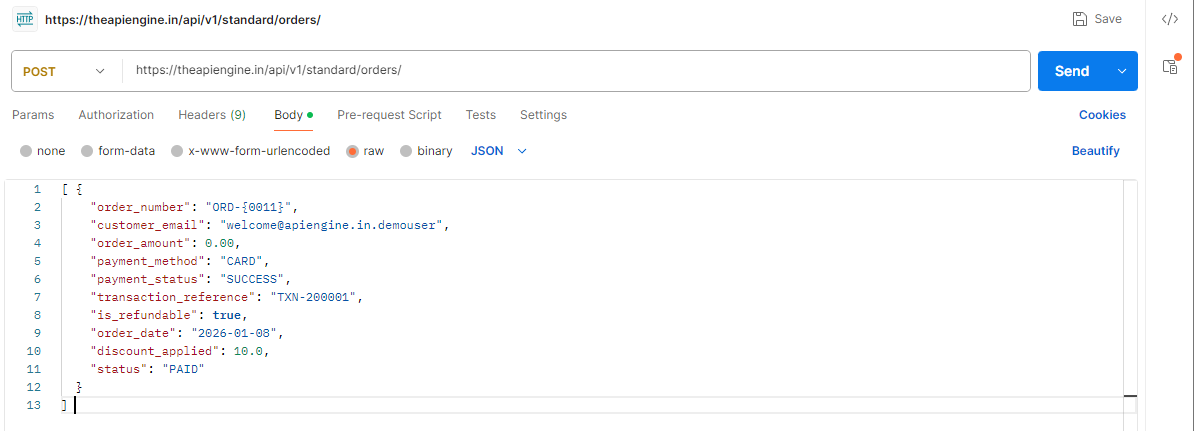
Step 6 : Click on the Body tab, and select
raw. In the dropdown menu on the far right, selectJSON -
Step 7 : In the Body tab, you need to provide the field names, and the values for creating a Standard Object record.Now, you can either copy and paste the following values, or modify them as per your will.
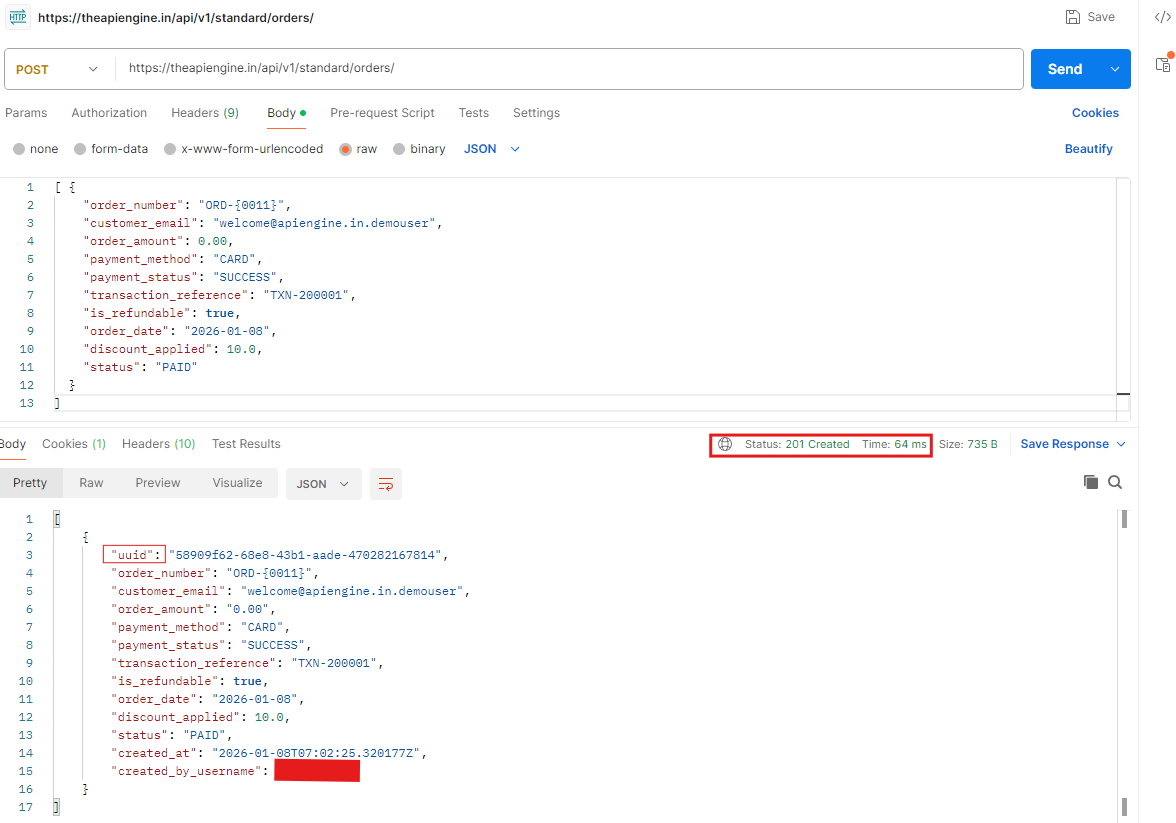
[{ "order_number": "ORD-0001", "customer_email": "welcome@apiengine.in.demouser", "order_amount": 0.00, "payment_method": "CARD", "payment_status": "SUCCESS", "transaction_reference": "TXN-200001", "is_refundable": true, "order_date": "2026-01-08", "discount_applied": 10.0, "status": "PAID" }] - Step 8 : Click on Send. If your credentials are valid, and you have entered the correct values for data types, APIEngine will return you a 201 CREATED response. In the Body section below, you will see a returned JSON response, which contains the details of the record created.
-
Step 9 : To verify, your record was created, you can head on to
https://theapiengine.in/v1/standard/orders/
You will be able to see your created record present on the page with a unique UUID, which can then be used to query, update, or delete this record. -
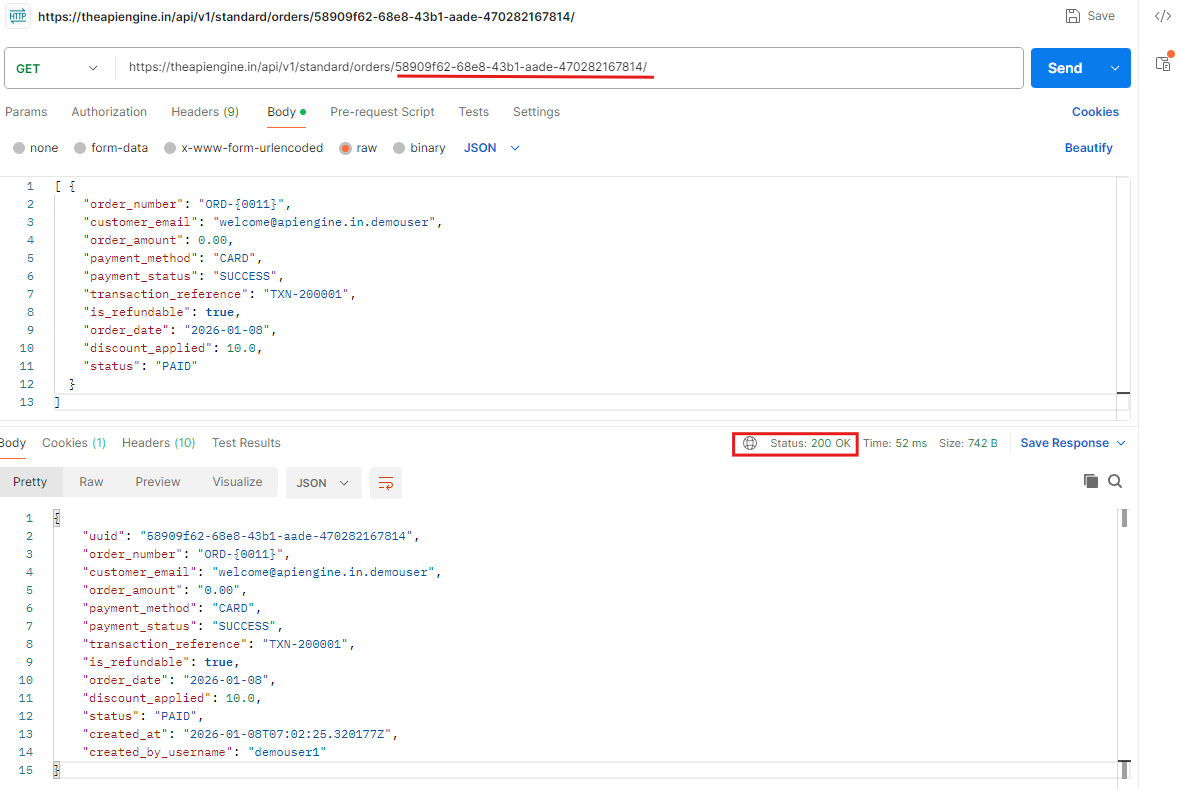
Step 10 : If you want, you can also test this functionality by querying this record from Postman. In the URLs section, enter
https://theapiengine.in/api/v1/standard/orders/{uuid}
If you have entered the correct record UUID, APIEngine will return you a 200 OK response, and in the Body section below, you will be able to see your record details.
Note : In case you use an expired or an incorrect access token to access APIEngine's resources, you will get a 401 Unauthorized error. In such case, it is recommended you generate or refresh your token, and repeat.

🎉 You’ve Made Your First Successful API Call
You’ve authenticated with APIEngine, understood how data models work, and successfully retrieved or created real records through the API.
At this point, you’ve already crossed the hardest part:
- Your credentials are working
- Your permissions are correct
- Your requests are valid
- Your data is real and persisted
This is the moment where APIEngine stops being documentation — and starts being infrastructure you can rely on.
✅ What You Can Do Now
With the same patterns you’ve already used, you can now:
- 📦 Work with Standard Objects out of the box
- 🧩 Create and manage Custom Objects for your own data
- 🔄 Perform create, read, update, and delete operations
- 📊 Query, filter, and sort records predictably
- 🚀 Scale from single requests to bulk operations
From here on, you’re no longer learning how the platform works — you’re deciding what to build with it.